Creating Your First Session
-
See Written Details
Create New Class
To create your class, login with your teacher/admin account. From the main menu, hover over the Administrator dropdown menu. Then, select Create Session and you’ll be brought to the page you see below. If it’s your first time logging in, and you’ve never set-up a challenge, you will be prompted to set-up a class right away.

Challenge Details
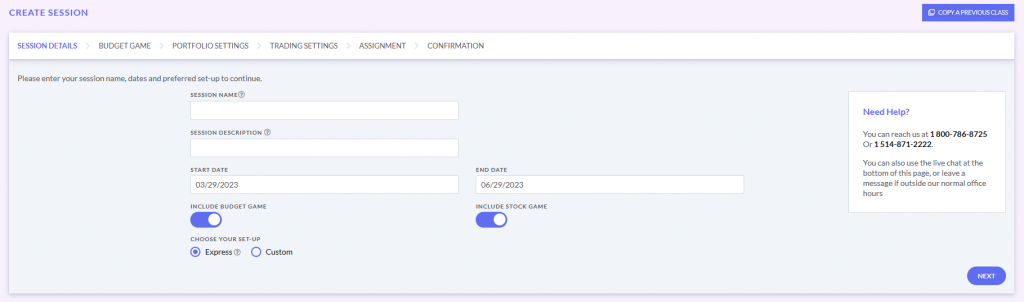
- Challenge Name: This is the name of your class, this is what your students and you will see as your class name. e.g. Fall 2020 – Block 1 or Economics Homeroom or Stock Market Enthusiasts.
- Description: This is a longer area to describe your class; which is useful when you have multiple classes with similar names. Use this to distinguish the right one for your students.
- Start/End Dates: These are the dates that your students can register into your class and play the games. Outside of these dates, no new students can join or play the Budget Game or Stock Game.
- Include Budget Game/Stock Game: By default, it will be set to “include” both games, and you will see the toggle button is blue. Create a class without one or the other by switching them off.
- Choose Your Set-Up: If you want to keep the default settings, keep the Express option turned on. To customize your game settings, choose Custom.
If you choose the Custom option, you’ll see additional class parameters appear below.
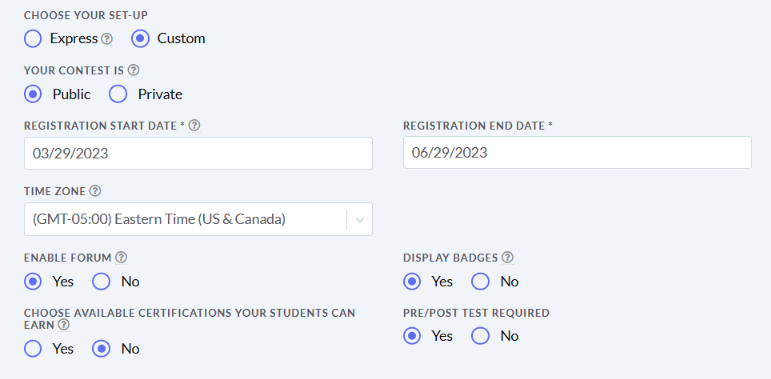
- Your Contest is (Public/Private): If you make your contest private, your students will need to enter a password to be able to register. Public contest means that students will click on the unique registration link only.
- Registration Start/End Dates: These are the dates that your students can register into your class. Outside of these dates, no new students can join (we can change this later if needed). You can have different registration dates from the Stock Game/Budget Game dates.
- Time Zone: The time zone you select will not impact when students are able to access the games and lessons.
- Enable Forum: You can turn this on/off at any time. While turned on, students can post messages and answer them while logged onto the platform.
- Display Badges: Students will earn badges from all actions they perform in the games.
- Display Certifications: Upon completing our core curriculum, (if selected from the assignments creation section) your students can earn a certificate in Investing101 – Beginner’s Investing or a Financial Literacy Certification.
- Pre/Post Test Required: Students will be prompted to answer basic financial literacy questions before being able to play the games, as well as at the end of your class, to gauge how much they’ve learned about core concepts while using PersonalFinanceLab.
Budget Game
If you’ve enabled the Budget Game, you will have the choice to use the recommended settings or customize to match your local standard of living. You can choose to include the Apartment feature, this allows students to see where they live, and purchase additional items to match their living preferences.
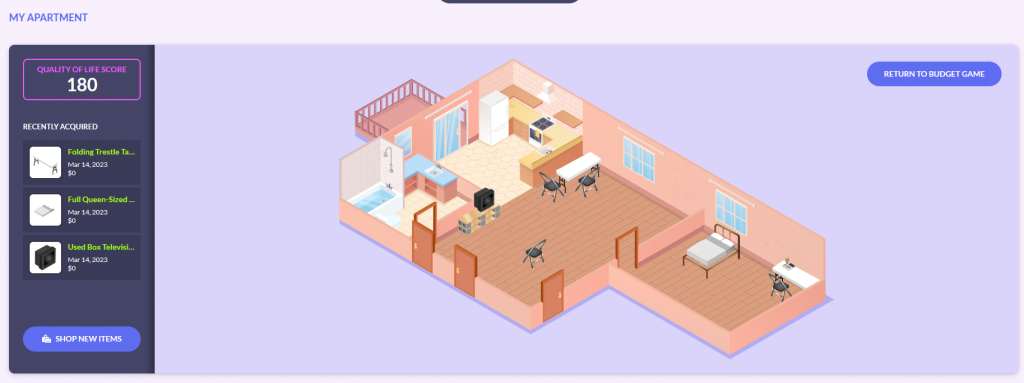
My Apartment Feature
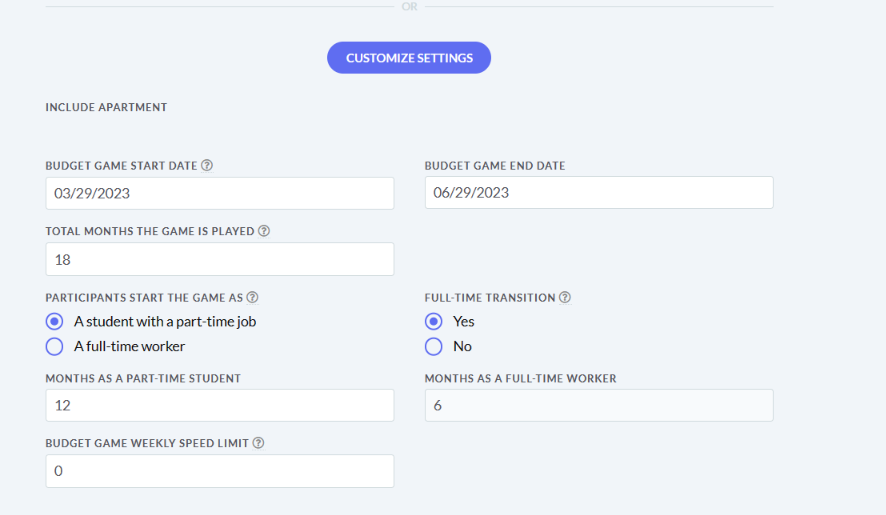
To customize the Budget Game, click Customize Settings, or else click Continue with Recommended Settings to continue. Please jump to the next section if you only purchased the Stock Game.
- Budget Game Start/End Dates: This is the timeframe when students are able to play the game.
- Total Months the Game is Played: Each month takes roughly 20 minutes to complete. You can have as few or as many months as you like.
- Participants Start the Game as: Do you want your students starting as college students with part-time jobs or starting as full-time workers? You can also decide to have them start as students and graduate after a set amount of months. You also choose when this transition occurs. From that point onward they will graduate and become full-time professionals with larger bills to pay and earning a higher salary.
- Speed Limit: Limit how many months students can complete per week in real-life. So, if you put 2 here, students can complete two months of the game during the week. The following week they can complete another two months…
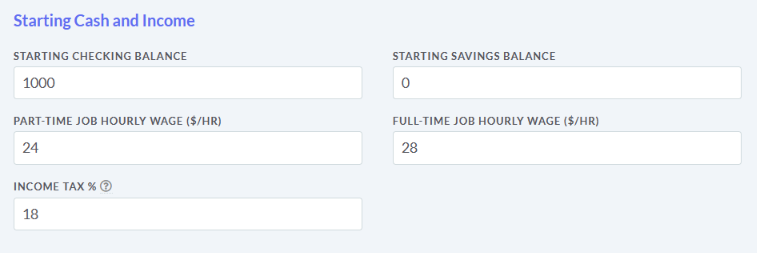
Starting Cash and Income
- Starting Account Balances: Choose how much money students start with in their checking and savings accounts. TIP – One of the goals is for students to learn how to save and build an Emergency Savings Fund, so we recommend you have $0.00 in their savings account.
- Hourly Wage ($/hr): Choose the hourly rate for the part-time mode, and the rate for the full-time mode. TIP: Students will earn a higher hourly wage when they study or do more personal development on the weekends.
- Income Tax %: Adjust to reflect the income tax of your province or state.
Recurring Monthly Bills and Expenses
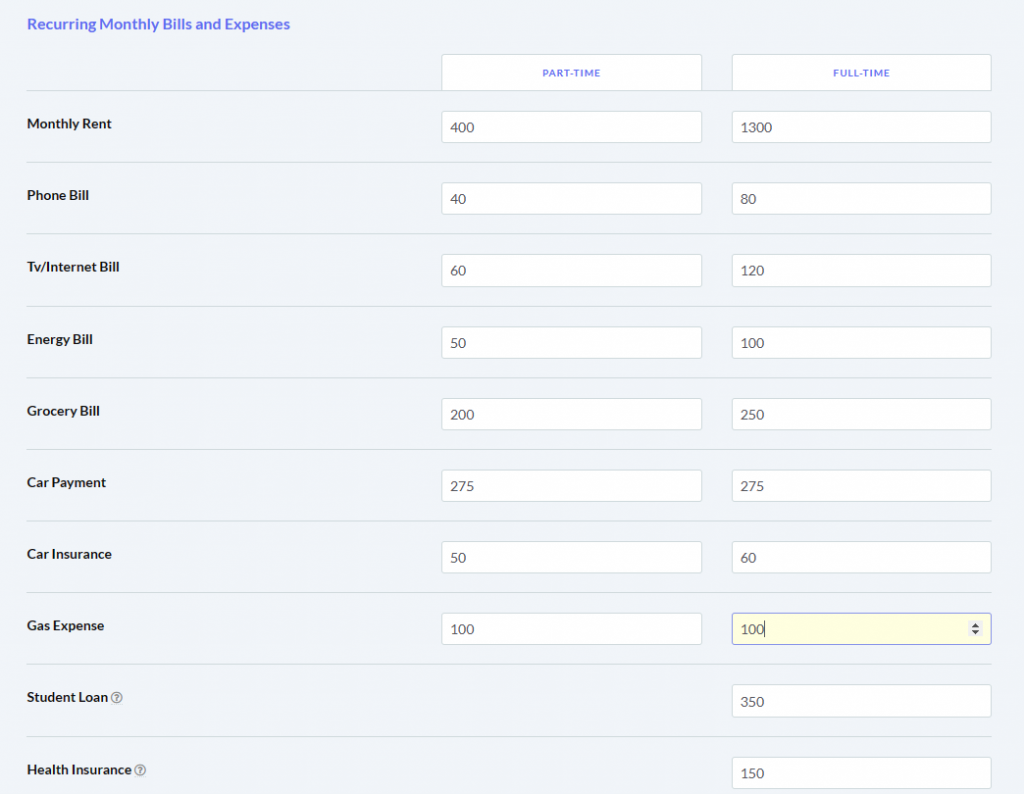
- Recurring Monthly Bills and Expenses: Choose how much students will pay for each of their monthly expenses in both game modes.
- Student Loan/Health Insurance: If you don’t want these expenses to be included, change the amount to $0.00.
TIP: Do a practice round where students do research on the average expenses in your area, (cell phone plans, gas expenses etc.) and then update the bills to reflect their findings on local prices. In the next round of the game, they will see the impact of their research on their experience in the game. You could turn this into an activity to see the different standards of living in different areas of the country!
Life Event Emphasis
If you don’t check any of the boxes, the Budget Game will randomly distribute pop-up choice cards from each of these categories. You can update the life events at any time to reinforce topics or lessons covered in class.

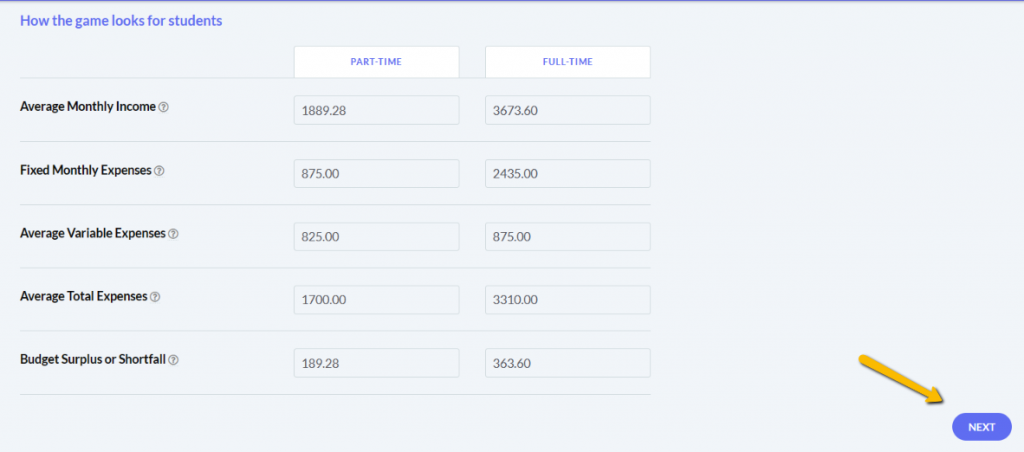
How the Game looks for Students
If you’ve made any changes to the default settings this area will show you whether you’ve made the game too difficult to win. Whenever you’ve finished adjusting the settings, click Next to continue.
Stock Game
If you want to keep the Stock Game enabled in your class, keep the button on, (blue). If not, toggle it off and continue to the next section by clicking Next in the bottom right corner of your screen.
Your Trading Start/End Dates can be different from your Budget Game dates. So, if you want your students to have access to one game at a time, choose which game they start with by adjusting the dates.
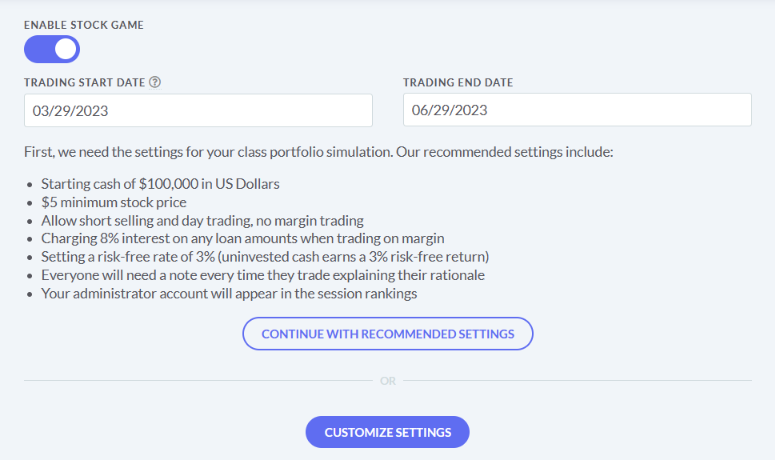
To customize the Stock Game, click Customize Settings, or else click Continue with Recommended Settings to continue. You’ll see a list of the trading settings that your class will include below the trading dates. You can edit these at any time from the Edit Session Settings Page.
Portfolio Settings
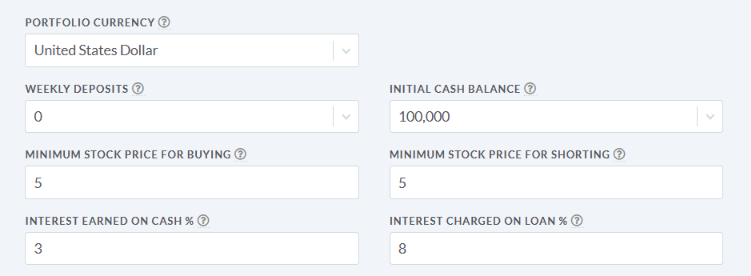
- Portfolio Currency: This is the currency your students will be trading in. This cannot be changed later.
- Weekly Deposits: Students receive “new money” in their accounts at the start of each week. You can turn this on or off at any time. TIP: These deposits can recreate what real investors do each month as they put money aside to invest in their portfolios to save up for retirement or some other large purchase.
- Initial Cash Balance: This is your student’s starting cash, in the currency you chose above.
- Minimum Stock Price for Buying: Some teachers don’t want their students playing with penny stocks, this lets you put a price floor on what the students can buy.
- Minimum Price For Shorting: Same as above, but applies to short selling.
- Interest Earned on Cash %: The default setting is 3%, which will mean that students will earn 3% by doing nothing with their initial cash. TIP: To encourage your students to invest, you can decrease this to 1%, or even use negative integers!
- Interest Charged on Loan %: If you have margin trading enabled, this is the interest rate that will apply once they start using their loan.
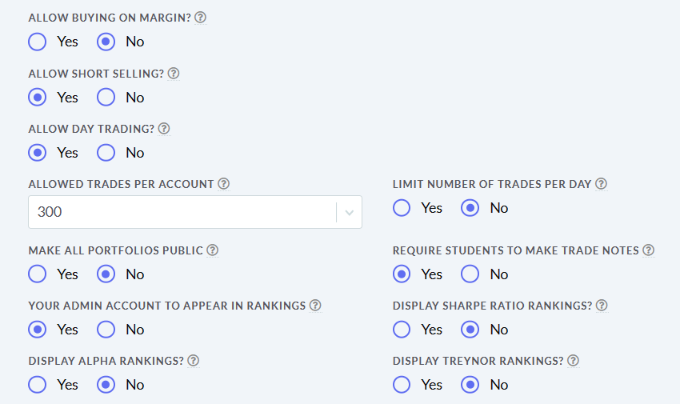
- Allow Buying on Margin: This will allow students to borrow money based on their asset value. If students borrow money they will be charged interest.
- Allow Short Selling/Day Trading: This will allow your students to short sell or day trade respectively. If day trading is disabled, students will not be able to buy and sell the same stock on the same day.
- Allowed Trades per Account: Choose one of the options between 10 and 1000. This includes both buy and sell orders.
- Limit Number of Trades per Day: By default, students can place as many trades as they like per day. Specify how many trades students can make by selecting Yes.
- Make All Portfolios Public: By default, students are not able to see each others’ portfolios. Select Yes if you want students to be able to view each others’ holdings.
- Require Trade Notes: By default, students will need to justify their investing decisions by completing the trade notes when they place an order to buy/sell. TIP: Trade notes can be exported along with all of their transactions to review how their strategies changed over time.
- Your Admin Account to Appear in Rankings: You can participate too! And students love to compete against their teacher. Turning this off will remove you from the rankings.
- Display Sharpe Ratio Rankings: This is for advanced tournaments, it will allow you to rank your students by risk-adjusted returns.
- Display Alpha Rankings: This is similar to the ranking above, but it can be more accurate in tournaments that trade only US stocks (but less accurate with international stocks).
- Display Treynor Rankings: This performance metric measures the portfolio as a whole, not the performance of individual holdings.
Trading Settings
Choose the security types and exchanges your students are able to trade by selecting Customize Settings. By toggling on the Show Advanced Rules button, you can set position limits and diversification per asset class. If you want to quickly include all asset classes choose Select All.
- Position Limit: How much a student can invest in one company or ticker symbol based on the current portfolio value. For example, with $100,000 as the initial cash, a 20% position limit will mean students can invest $20,000 in any company/equity/mutual fund etc.
- Diversification: How much a student can invest in one asset class. So if you set this to 50% for equities/stocks, your students will have to either keep the balance of their portfolio in cash, or invest in other security types. TIP: If you have margin trading enabled, you’ll want more than 100% enabled or else they will not be able to use their loan.
To continue with the recommended settings that are listed at the top of your screen, click Continue with Recommended Settings.
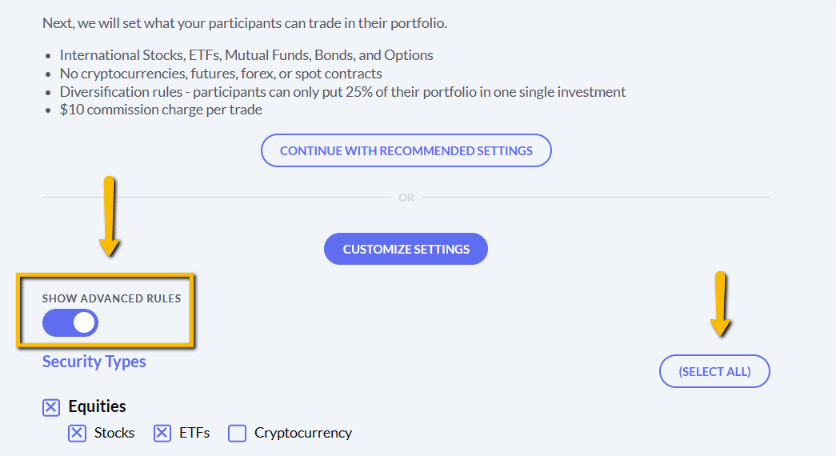
Security Types
You can choose between equities, ETFs, cryptocurrencies, options, mutual funds, bonds, futures, future options, forex and cash spots. You can also set different commission rates, and the way commissions are charged (per trade, per share, or as a percentage of the total order).
Exchanges
Add an X to each country you want students to have access to. US exchanges include United States, AMEX, NASDAQGS and NYSE. The exchanges only impact your equities/stock trading. We currently only support international securities for equities, spots (for currency trading), and futures (mutual funds, bonds, and options are US-only).
To quickly include all exchanges in your class, click Select All.
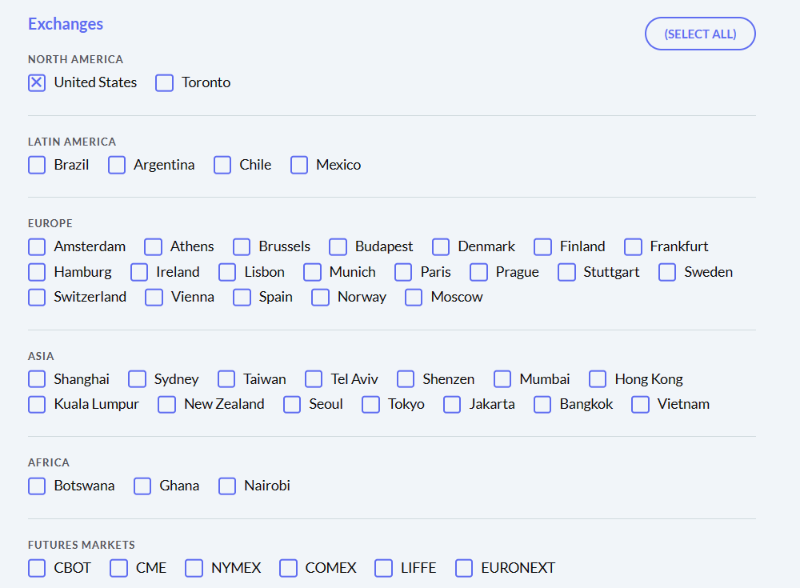
Customize Exchanges
If you turn this on, you’ll be able to either select “White Listed Stocks” or “Black Listed Stocks”. You can’t have both, so read on to see if either of these situations apply to you. You add custom exchanges at any time.
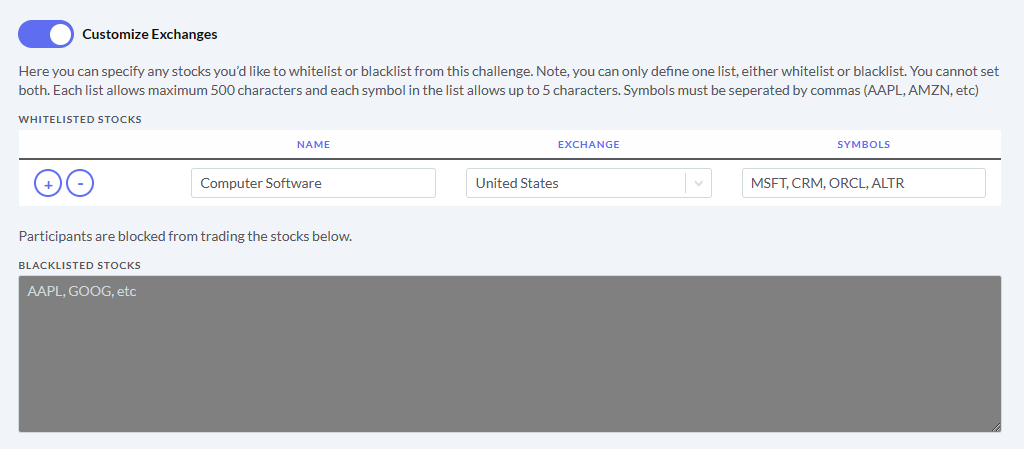
- White Listed Stocks: Use this setting if you want to run a challenge where students are only able to trade a specific list of stocks, (e.g. consumer staples, S&P 500 companies or companies headquartered in your state/area). Enter the ticker symbol of each company that you want included, separated by a comma, and specify the exchange. The name you provide is what will appear for students on the trading page.
- Black Listed Stocks: If there are companies that you don’t want your students to trade, list their ticker symbols in the available text box separated by commas.